How to Sprout Cloves at Home with a Simple, Natural Trick
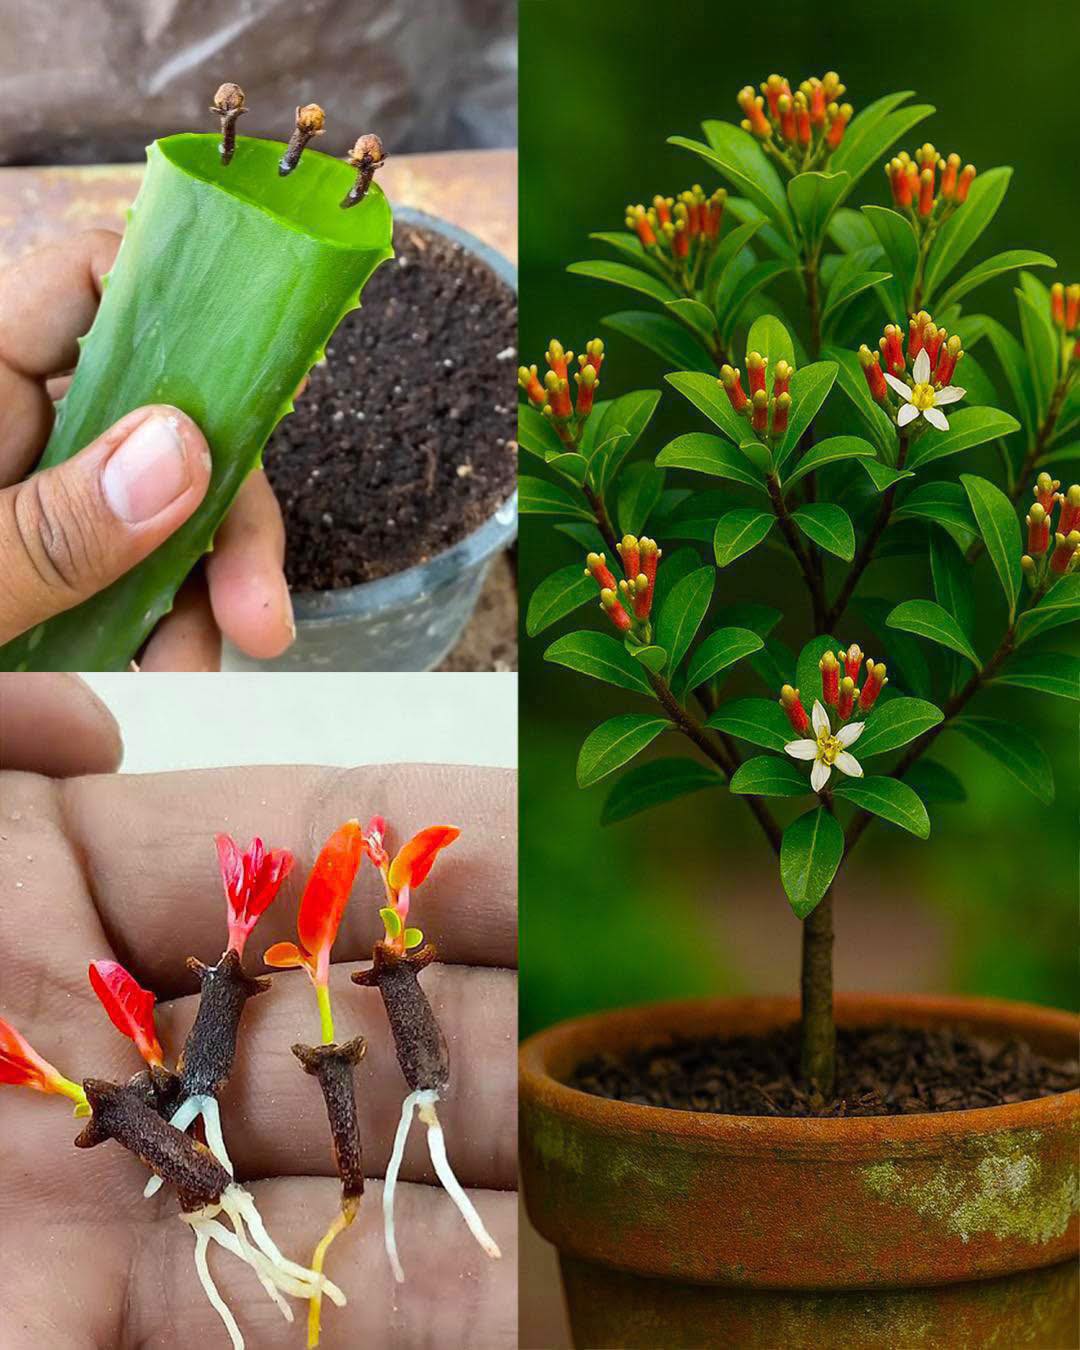
Imagem: Reprodução
Publicado em 22 de maio de 2026
Learn how to sprout cloves using only a potato and aloe vera. A practical and surprising method.
Have you ever used cloves in cooking or as a home remedy? It's quite likely you have. What many people don't know is that even after drying, this floral bud still holds life.
And the most incredible part: it's possible to make them sprout at home, with a method so simple it seems like magic.
Here, we'll show you how to make cloves germinate using only a potato, aloe vera gel, and a well-lit spot. All naturally, without fertilizers, without soil, and without complications.
If you're curious about green experiments, enjoy planting, or want an educational activity to do with children, prepare to be amazed by this small experiment.
Besides being fun, it's a clever way to observe the cycle of life unfolding before your eyes. And the best part: using only what you probably already have at home.
Read also

Why Can Cloves Germinate Even After Drying?
Cloves are actually the flower buds of the clove tree, harvested before opening and sun-dried. Despite being dry, they still retain some dormant vital energy. And this is precisely what makes the process possible.
With moisture and light nutrients, the bud can awaken. It's as if nature is just waiting for the right signal to start the show.
In this method, the potato acts as a base rich in water and starch. The aloe vera gel provides a boost with its natural enzymes, aiding in the hydration and nourishment of the future root.

What You'll Need to Germinate Cloves
Before you start, gather the items below:
- One fresh potato, preferably organic
- 8 to 12 whole cloves (shiny and without cracks)
- A small, shallow container
- Filtered water
- Pure aloe vera gel (alcohol and fragrance-free)
- A spray bottle
- A label with the date
- A bright spot, but without direct sunlight
That's it. No soil, fertilizer, or pots at the beginning. The secret lies in the simplicity of the process.
Step-by-Step Guide to Sprouting Cloves
Now, let's get to the important part: how to do it.
- Slice the potato: Cut a slice 2 to 3 cm thick.
- Lightly dry: Use a paper towel to remove excess moisture from the surface.
- Insert the cloves: With the pointed end facing down, insert the cloves into the potato, leaving a small space between them. There's no need to push them in too deep.
- Set up the experiment: Place the slice in a shallow container and position it in a well-lit spot, but away from direct sunlight.
- Hydrate daily: Mix a few drops of aloe vera gel with water and spray the potato once a day. On dry days, do this in the morning and at night.
In two to four weeks, small white roots will start to appear. Then, reddish sprouts will emerge. It's like watching a green miracle unfold in your home.
Important Cares to Avoid Losing Everything
Even though it's simple, the process requires attention to a few details.
Avoid the most common mistakes:
- Don't push the cloves too deep into the potato.
- Don't soak the potato with water.
- Never use aloe vera gel with additives.
- Avoid dull, old, or broken cloves.
- Protect the experiment from direct sunlight, which can dry everything out.
These precautions make all the difference in successful germination.

What Happens When Cloves Grow Roots?
When the roots are 3 to 4 cm long, it's time to transplant. Take a small pot with light soil and plant carefully, maintaining moisture without waterlogging.
Ideally, leave the pot in a well-lit spot, protected from sudden temperature changes.
Gradually, the little plant will grow and strengthen, bringing not only beauty but also that unmistakable aroma of cloves.
Extra Tips Based on Climate
The environment greatly influences the success of the process. Here's how to adapt:
- Dry weather: Spray water with aloe vera twice a day.
- Humid weather: Check for signs of mold on the potato.
- Winter: Keep near a window with good lighting.
- Summer: Keep in a cool place, away from direct sunlight.
With these adjustments, your experiment has a high chance of succeeding in any season.
Sprouting cloves at home isn't just a botanical curiosity. It's an invitation to patience, care, and the rediscovery of the power that exists in small things.
Who would have thought that such a common kitchen spice could one day bloom in your hands?
Read also
Comments (0)
No comments yet. Be the first to comment!