Grow Your Own Ginger with Just a Glass of Water: A Proven Method
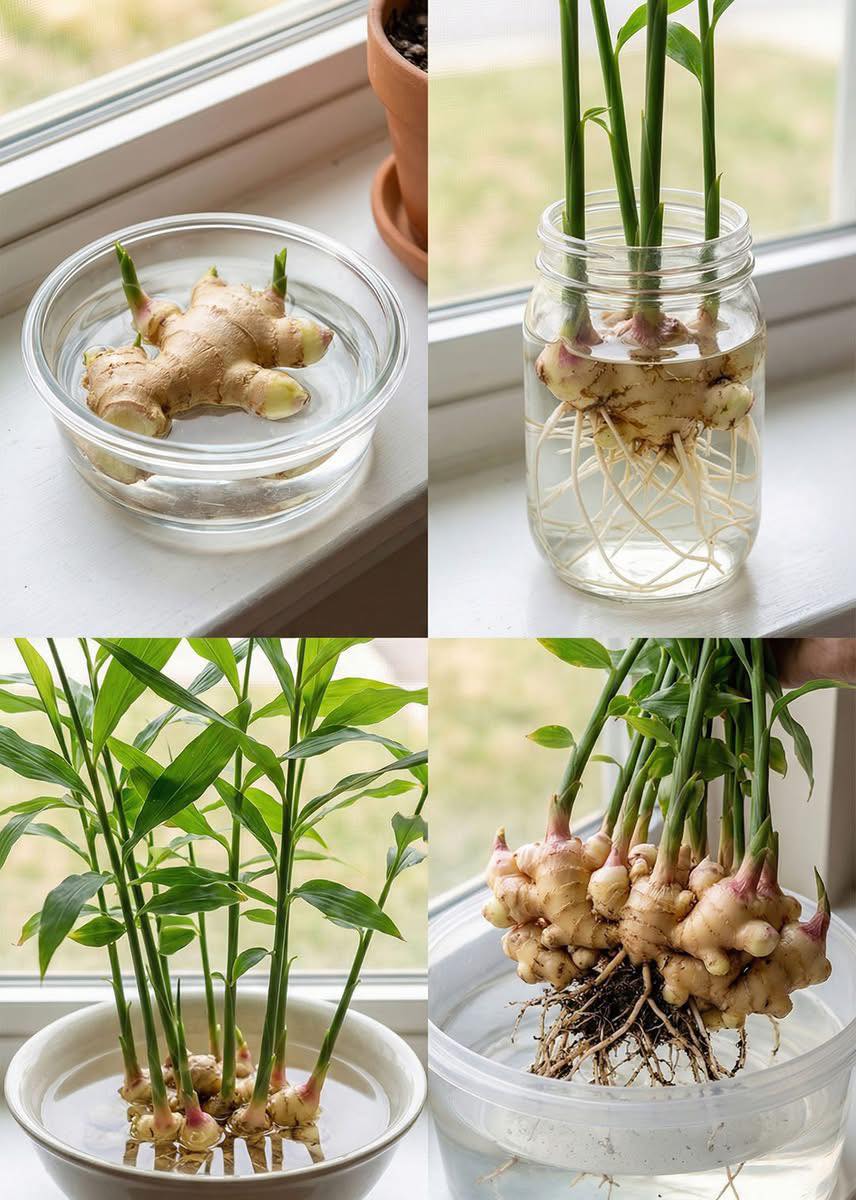
Imagem: Reprodução
Publicado em 16 de abril de 2026
The technique is simple, effective, and perfect for small spaces.
Growing ginger at home might seem like a task only for gardening experts, but that's not quite true. The fact is, with a glass and a little attention, you can watch this rhizome come to life in just a few days. And the best part: no soil, no mess, and no complications.
Beyond its functionality, this cultivation method has a unique charm. Observing the birth of roots and the emergence of green sprouts can be almost therapeutic.
The experience goes far beyond the ginger itself. It's a direct connection to the natural growth process, visible day after day right in your own kitchen.
What many people don't know is that this technique also doubles as a form of living decor. A simple glass can become a focal point in any room, bringing freshness, color, and an extra dose of vitality. And, of course, if you wish, you can also transplant the ginger into a pot and harvest its bounty later.
But before thinking about what to do next, you need to learn how to start. And the step-by-step process is easier than it seems. See below!
Read also

1. Choose a good piece of ginger
The success of this cultivation begins with choosing the right rhizome. The ginger should be:
- Firm and healthy-looking
- With visible sprouts (the so-called “eyes”)
- Preferably organic, as non-organic products often contain germination inhibitors
Avoid shriveled pieces or those with dark spots. The fresher and more “alive” the ginger, the higher your chances of success.

2. Prepare the ideal glass for cultivation
Now it's time to set up the environment where your ginger will grow. To do this, follow these tips:
- Use a transparent glass, preferably wide and stable
- Place a few small stones at the bottom to support the ginger and add an aesthetic touch
- Add water until it lightly touches the bottom part of the rhizome, without completely submerging it
This detail about the water is essential. Ginger needs constant humidity, but excess water promotes rot. Therefore, the water should be changed every two or three days.
3. Choose the right spot for the glass
The location where you place the glass makes all the difference in the ginger's growth. To ensure good development, consider:
- Natural light should be abundant, but indirect
- Spots near windows are great, as long as direct sunlight doesn't hit it
- The ideal temperature is above 18°C (64°F)
These conditions help the ginger “wake up” and begin its sprouting process. In very cold environments, it may go dormant and not develop.

4. Observe and monitor the transformations
After a few days, you'll start to notice the first changes. Here's what usually happens between the first and third week:
- Roots begin to extend into the water
- Small green sprouts emerge from the ginger's “eyes”
- The structure begins to become more robust and visually interesting
This process can be fascinating. And, with the right care, the ginger will continue to grow healthily.
If any part starts to soften or darken, carefully remove it. This prevents the rest of the rhizome from being affected.
5. Keep it in the glass or plant it in soil?
After a few weeks, you'll have two options:
- Keep the ginger in the glass, simply as a decorative and living element
- Transplant it into a pot with light soil, if you want to harvest new pieces in the future
If you choose the second option, remember to keep the soil consistently moist, but never waterlogged. Ginger grows horizontally, so wide pots are more suitable than deep ones.
More than just a root with known properties, ginger can be a gateway for anyone looking to start growing plants at home in a practical way. Growing it in a glass shows that it's possible to have greenery in your daily life with minimal space and no complications.
Read also
Comments (0)
No comments yet. Be the first to comment!